ip firewall
nat
add
action=masquerade src-address-list=localNet chain=srcnat
comment="NAT-LOCAL" disabled=no \
out-interface=Public
add
action=masquerade src-address-list=ProxyNet chain=srcnat comment="NAT-PROXY"
disabled=no \
out-interface=Public
add
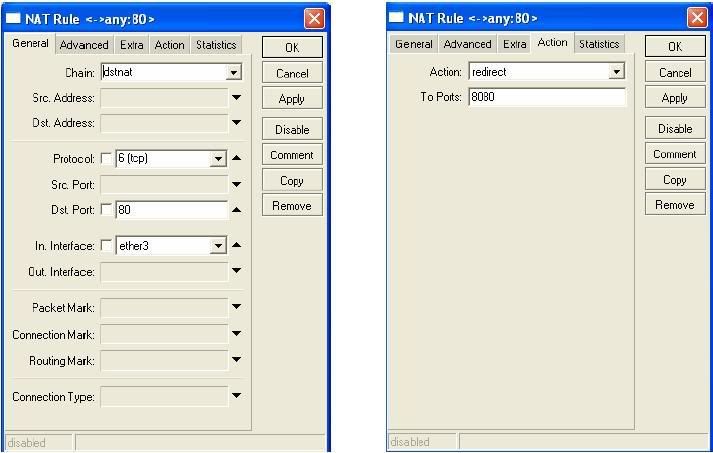
action=dst-nat chain=dstnat comment="TRANSPARENT PROXY" disabled=no \
dst-address-list=!ProxyNET
dst-port=80,8080,3128 in-interface=Local \
protocol=tcp
to-addresses=192.168.3.2 to-ports=3128
(atau yang
saya punya redirect proxy seperti ini :)
add
action=dst-nat chain=dstnat comment="TRANSPARENT PROXY" disabled=no \
src-address=192.168.2.2-192.168.2.17
dst-port=80,8080,3128 in-interface=Local \
protocol=tcp
to-addresses=192.168.3.2 to-ports=3128
add
action=dst-nat chain=dstnat comment="TRANSPARENT DNS" disabled=no \
dst-port=53
in-interface=Local protocol=udp to-ports=53
add
action=dst-nat chain=dstnat comment="" disabled=no dst-port=53 \
in-interface=Local
protocol=tcp to-ports=53
add
action=dst-nat chain=dstnat comment="" disabled=no dst-port=53 \
in-interface=Proxy
protocol=udp to-ports=53
add
action=dst-nat chain=dstnat comment="" disabled=no dst-port=53 \
in-interface=Proxy
protocol=tcp to-ports=53
Penjelasan :
-
Transparent DNS agar client tidak bisa menggunakan NS selain yang terpasang di
mikrotik
(bisa sobat gunakan atau tidak, tergantung
keinginan)
-
Mengarahkan request dari client tujuan port 80,8080,3128 ke squid external
saya beri contoh 2 untuk redirect terserah
sobat mo pilih yang mana pastinya keduanya jalan
jika ada interface lain misalkan hotspot
sobat tingal tambahkan tanda ! pada src.address atau dst.address list
Untuk
manglenya biar saya jelaskan satu-persatu biar tidak bingung :
/ip firewall
mangle
add action=mark-packet
chain=forward comment="PROXY-HIT-DSCP 12" disabled=no \
dscp=12
new-packet-mark=proxy-hit passthrough=no
Menandai
paket proxy-hit dari external proxy yang nantinya pada rule queue diberikan
kebebasan tanpa proses limitasi
add
action=change-dscp chain=postrouting comment=CRITICAL disabled=no \
new-dscp=1
protocol=icmp
add
action=change-dscp chain=postrouting comment="" disabled=no
dst-port=53 \
new-dscp=1
protocol=udp
add
action=change-dscp chain=postrouting comment="" disabled=no
dst-port=53 \
new-dscp=1
protocol=tcp
add
action=mark-connection chain=postrouting comment="" disabled=no
dscp=1 \
new-connection-mark=critical_conn
passthrough=yes
add
action=mark-packet chain=postrouting comment="" connection-mark=\
critical_conn
disabled=no new-packet-mark=critical_pkt passthrough=no
Menandai
paket ICMP dan DNS request untuk diberikan prioritas tertinggi
add
action=mark-connection chain=prerouting comment=MARK-ALL-CONN disabled=no \
dst-address-list=!localNet
in-interface=Local new-connection-mark=\
all.pre_conn
passthrough=yes
add
action=mark-connection chain=forward comment="" disabled=no \
new-connection-mark=all.post_conn
out-interface=Local passthrough=yes \
src-address-list=!localNet
add
action=mark-packet chain=prerouting comment="" connection-mark=\
all.pre_conn
disabled=no new-packet-mark=all.pre_pkt passthrough=yes
add
action=mark-packet chain=forward comment=""
connection-mark=all.post_conn \
disabled=no
new-packet-mark=all.post_pkt passthrough=yes
Menandai
SEMUA paket keluar masuk dari Local interface SELAIN ke Local Address
add
action=mark-connection chain=prerouting comment=GAMES connection-mark=\
all.pre_conn
disabled=no dst-port=9339,843 new-connection-mark=games_conn \
passthrough=yes
protocol=tcp
add
action=mark-connection chain=prerouting comment="" connection-mark=\
all.pre_conn
disabled=no dst-port=40000-40010 new-connection-mark=\
games_conn
passthrough=yes protocol=udp
add
action=mark-packet chain=forward comment="" connection-mark=games_conn
\
disabled=no
new-packet-mark=games_pkt passthrough=no
Menandai
Paket GAMES untuk diberikan prioritas KEDUA
add
action=mark-connection chain=prerouting comment=HTTP-CLIENT \
connection-mark=all.pre_conn
disabled=no new-connection-mark=\
browsing_conn
packet-size=0-64 passthrough=yes protocol=tcp tcp-flags=ack
add
action=mark-connection chain=prerouting comment="" connection-mark=\
all.pre_conn
disabled=no dst-port=80,443 new-connection-mark=\
browsing_conn
passthrough=yes protocol=tcp
add
action=mark-packet chain=forward comment="" connection-bytes=0-131072
\
connection-mark=browsing_conn
disabled=no new-packet-mark=browsing_pkt \
passthrough=no
protocol=tcp
add
action=mark-connection chain=prerouting comment=HTTP-PROXY disabled=no \
dst-address-list=!localNet
dst-port=80,443 new-connection-mark=proxy_conn \
passthrough=yes
protocol=tcp src-address-list=ProxyNET
add
action=mark-packet chain=forward comment=""
connection-mark=proxy_conn \
disabled=no
new-packet-mark=proxy_pkt passthrough=no
Menandai
paket untuk browsing TERMASUK http req dari external proxy dengan
conn-byte=0-131072 serta paket-paket protocol tcp yang berukuran kecil
(packet-size=0-64 tcp-flags=ack) untuk diberikan prioritas KETIGA
add
action=mark-connection chain=prerouting comment=REALTIME connection-mark=\
all.pre_conn
disabled=no dst-port=22,179,110,161,8291 \
new-connection-mark=realtime_conn
passthrough=yes protocol=tcp
add
action=mark-connection chain=prerouting comment="" connection-mark=\
all.pre_conn
disabled=no dst-port=123 new-connection-mark=realtime_conn \
passthrough=yes
protocol=udp
add
action=mark-packet chain=forward comment=""
connection-mark=realtime_conn \
disabled=no
new-packet-mark=realtime_pkt passthrough=no
Menandai
paket-paket REALTIME ACCESS untuk diberikan prioritas KEEMPAT
add
action=mark-connection chain=prerouting comment=FILETRANSER \
connection-mark=all.pre_conn
disabled=no dst-port=20,21,23 \
new-connection-mark=communication_conn
passthrough=yes protocol=tcp
add
action=mark-packet chain=forward comment="" connection-mark=\
communication_conn
disabled=no new-packet-mark=communication_pkt \
passthrough=no
Menandai
paket-paket FILETRANSFER untuk diberikan prioritas KELIMA
add
action=mark-connection chain=prerouting comment=NORMAL connection-mark=\
all.pre_conn
disabled=no dst-address-list=!ProxyNET new-connection-mark=\
normal_conn
passthrough=yes
add
action=mark-packet chain=forward comment=""
connection-mark=normal_conn \
disabled=no
new-packet-mark=normal_pkt passthrough=no
Menandai
semua paket yang tersisa SELAIN tujuan Proxy untuk diberikan prioritas KEENAM
add
action=mark-packet chain=forward comment=DOWNLOAD connection-bytes=\
131072-4294967295
connection-mark=all.post_conn disabled=no dst-address=\
192.168.2.2
new-packet-mark=client1 passthrough=no protocol=tcp
add
action=mark-packet chain=forward comment="" connection-bytes=\
131072-4294967295
connection-mark=all.post_conn disabled=no dst-address=\
192.168.2.3
new-packet-mark=client2 passthrough=no protocol=tcp
………………..dst
sampai jumlah client yang di perlukanterpenuhi
add
action=mark-packet chain=forward comment=DOWNLOAD-NO-LIMIT connection-bytes=\
131072-4294967295
connection-mark=all.post_conn disabled=no dst-address=\
192.168.2.16
new-packet-mark=client16 passthrough=no protocol=tcp
add
action=mark-packet chain=forward comment="" connection-bytes=\
131072-4294967295
connection-mark=all.post_conn disabled=no dst-address=\
192.168.2.17
new-packet-mark=client17 passthrough=no protocol=tcp
Menandai paket
protocol tcp yang diteruskan ke client untuk memberikan batasan download pada
masing-masing client dengan conn-byte=131072-4294967295
Setelah itu
buat queue type nya
/queue type
add kind=pcq
name=pcq_up pcq-classifier=src-address pcq-limit=200 pcq-rate=0 \
pcq-total-limit=8000
add kind=pcq
name=pcq_down pcq-classifier=dst-address pcq-limit=200 pcq-rate=\
0
pcq-total-limit=8000
add
kind=pfifo name=pfifo-critical pfifo-limit=10
add kind=pcq
name=pcq_critical.up pcq-classifier=src-address,src-port \
pcq-limit=20
pcq-rate=0 pcq-total-limit=500
add kind=pcq
name=pcq_critical.down pcq-classifier=dst-address,dst-port \
pcq-limit=20
pcq-rate=0 pcq-total-limit=500
di lanjut
menambahkan queue tree nya…..
/queue tree
add
burst-limit=0 burst-threshold=0 burst-time=0s disabled=no limit-at=0 \
max-limit=0
name="A. PROXY HIT" packet-mark=proxy-hit parent=Local \
priority=1
queue=default
add
burst-limit=0 burst-threshold=0 burst-time=0s disabled=no limit-at=0 \
max-limit=0
name="B. CRITICAL" packet-mark=critical_pkt parent=Public \
priority=1
queue=pfifo-critical
Tanpa limit
dengan prioritas pertama untuk proxy hit dan critical
add
burst-limit=0 burst-threshold=0 burst-time=0s disabled=no limit-at=0 \
max-limit=0
name="C. INBOUND" packet-mark=all.post_pkt parent=global-out \
priority=8
add
burst-limit=0 burst-threshold=0 burst-time=0s disabled=no limit-at=0 \
max-limit=0
name="D. OUTBOUND" packet-mark=all.pre_pkt parent=Public \
priority=8
Membuat
parent untuk inbound (traffic masuk ke client) dan outbound (traffic keluar
dari public)
Untuk child
INBOUND nya saya bagi menjadi beberapa prioritas seperti berikut :
add
burst-limit=0 burst-threshold=0 burst-time=0s disabled=no limit-at=0 \
max-limit=0
name="A. GAMES" packet-mark=games_pkt parent="C. INBOUND" \
priority=2
queue=pcq_critical.down
add
burst-limit=0 burst-threshold=0 burst-time=0s disabled=no limit-at=0 \
max-limit=0
name="B. HTTP" packet-mark=browsing_pkt parent="C. INBOUND"
\
priority=3
queue=pcq_down
add
burst-limit=0 burst-threshold=0 burst-time=0s disabled=no limit-at=64k \
max-limit=128k
name="C. REALTIME" packet-mark=realtime_pkt parent=\
"C.
INBOUND" priority=4 queue=pcq_critical.down
add
burst-limit=0 burst-threshold=0 burst-time=0s disabled=no limit-at=64k \
max-limit=128k
name="D. FILETRANS" packet-mark=communication_pkt parent=\
"C.
INBOUND" priority=5 queue=pcq_down
add
burst-limit=0 burst-threshold=0 burst-time=0s disabled=no limit-at=64k \
max-limit=128k
name="E. NORMAL" packet-mark=normal_pkt parent=\
"C.
INBOUND" priority=6 queue=pcq_down
selanjutnya
parent untuk download per client nya :
add
burst-limit=0 burst-threshold=0 burst-time=0s disabled=no limit-at=0 \
max-limit=1024k
name="F. DOWN 1M" parent="C. INBOUND" priority=8
add
burst-limit=0 burst-threshold=0 burst-time=0s disabled=no limit-at=0 \
max-limit=0
name="G. DOWN 2M" parent="C. INBOUND" priority=8
membuat 2
parent untuk 1M dan 2M (atau tanpa limit)
Setelah itu
buat child nya, untuk memberikan batasan download per clientnya
add
burst-limit=0 burst-threshold=0 burst-time=0s disabled=no limit-at=0 \
max-limit=256k
name=Client1 packet-mark=client1 parent=\
"F.
DOWN 1M" priority=8 queue=pcq_down
add
burst-limit=0 burst-threshold=0 burst-time=0s disabled=no limit-at=0 \
max-limit=256k
name=Client2 packet-mark=client2 parent=\
"F.
DOWN 1M" priority=8 queue=pcq_down
…………………..dst
sampai semua paket ke client yang di perlukan terpenuhi
Batasan
download sebesar 1M untuk semua client dan maksimum 256k per client
add
burst-limit=0 burst-threshold=0 burst-time=0s disabled=no limit-at=0 \
max-limit=0
name=Client16 packet-mark=client16 parent=\
"G.
DOWN 2M" priority=8 queue=pcq_down
add
burst-limit=0 burst-threshold=0 burst-time=0s disabled=no limit-at=0 \
max-limit=0
name=Client17 packet-mark=client17 parent=\
"G.
DOWN 2M" priority=8 queue=pcq_down
Tanpa
batasan download untuk IP 192.168.2.16 dan 192.168.2.17
Kemudiam
membuat limit untuk uploadnya
add
burst-limit=0 burst-threshold=0 burst-time=0s disabled=no limit-at=0 \
max-limit=0
name="A. GAMES UP" packet-mark=games_pkt parent="D.
OUTBOUND" \
priority=2
queue=pcq_critical.up
add
burst-limit=0 burst-threshold=0 burst-time=0s disabled=no limit-at=64k \
max-limit=256k
name="B. HTTP UP" packet-mark=proxy_pkt parent=\
"D.
OUTBOUND" priority=3 queue=pcq_up
add
burst-limit=0 burst-threshold=0 burst-time=0s disabled=no limit-at=32k \
max-limit=64k
name="C. REALTIME UP" packet-mark=realtime_pkt parent=\
"D.
OUTBOUND" priority=4 queue=pcq_critical.up
add
burst-limit=0 burst-threshold=0 burst-time=0s disabled=no limit-at=64k \
max-limit=128k
name="D. FILETRANS UP" packet-mark=communication_pkt \
parent="D.
OUTBOUND" priority=5 queue=pcq_up
add
burst-limit=0 burst-threshold=0 burst-time=0s disabled=no limit-at=64k \
max-limit=128k
name="E. NORMAL UP" packet-mark=normal_pkt parent=\
"D.
OUTBOUND" priority=6 queue=pcq_up


 :52595EA2


